This article is about the RV costs associated with owning, maintaining and repairing an RV.
And of course, many people buy RVs because they’re trying to save on vacation costs. So it’s often a budget thing that gets them into RVing.
And they have a budget for pretty much everything. That is, except for maintenance and repairs of the RV they intend to buy.

Very often, they have figured out the monthly payments, insurance, fuel and camping costs.
But maintenance and repairs on their future RV? Well, that’s kind of nebulous and more difficult to nail down.
Table of Contents
- Can You Project The Costs Of Owning An RV?
- A Good Source For Projecting RV Costs
- Repair And Maintenance Costs For Motorhomes
- More RV Costs Associated With Owning A Motorhome
- Is This All The Possible Repairs You May Have To Make?
- RV Costs Associated With Owning A Towable RV
- Where Are The Engine And Drivetrain Costs With Towable RVs?
- A Huge Factor In Managing RV Costs
- The Costs Of Owning A Large RV
- The Best Way To Keep RV Repair Costs Low
- How You Can Prevent Many Large RV Repair Bills
- How To Manage RV Costs With A Service Contract
- A Word About Saving Money At RV Repair Facilities
- Conclusion
Can You Project The Costs Of Owning An RV?
But RV maintenance and repairs can be a very significant annual cost for some RVers.
And of course, I can’t give you exact figures on what it’s going to cost you personally.
Because it will depend on the quality of the RV you have. And on the number of amenities and luxuries in it.
Also, it will depend to a large degree on how you care for your RV over the years too. In fact, that’s a big one!
But there’s several other factors as well. So what we can conclude is that it’s hard to give an exact figure that fits all situations.
A Good Source For Projecting RV Costs
But Wholesale Warranties has created an infographic that can be helpful.
Because I believe that it helps folks get a feel for many of the repair costs on an RV. By showing them what those costs could be before they buy.
And why am I turning to Wholesale Warranties for this information? Well, it’s because RV repairs is what their business is really all about.
That’s because they provide service contracts for RV buyers after their factory warranty expires.
So let’s take a look at what they say about RV repair costs overall and what you could expect.
Repair And Maintenance Costs For Motorhomes
And first of all, let’s look at a graphic they made on motorhome repair costs. Just look at the image below for that information.
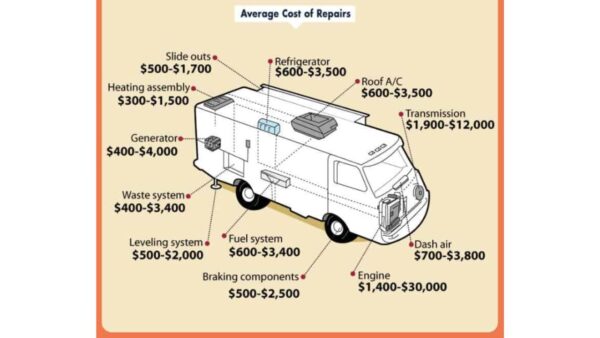
Now taking a look at that, let’s go up to the upper left hand side of the graphic. And we’ll cover each component by going clockwise.
So let’s start with heating first. And you can see that their projection is that expenses could be $300 to $1,500 in repairs.
Moving on to the next item, they project repair costs on slide out rooms to be $500 to $1700.
Well, honestly I feel like that could even be a little low in some cases. But next up is refrigerators at $600 to $3500 for repair costs.
Then roof AC’s are about the same amount at $600 to $3500. But then we get to the transmission in a motorhome. And that can be significant!
In fact, repairs there can run $1,900 to $12,000 depending on the kind of motorhome you have.
Then the dash air conditioning in a motorhome could be $700 to $3,800.
More RV Costs Associated With Owning A Motorhome
And now, just take a look at engine repair costs. Once again this is a biggie!
And that is especially true if it’s a big diesel engine. In fact, repairs could range from $1,400 to $30,000. That could be a huge expense for anyone!
Next up is the braking components on a motorhome. And that could be $500 to $2500 to repair.
The repairs on the fuel system can range from $600 to $3400. And the leveling system repairs can go from $500 to $2,000.
Then there’s the waste system that can cost $400 to $3,400 to repair.
And finally, what if you have an installed generator in your motorhome? Well, that could run anywhere from $400 to $4,000 for repairs.
Is This All The Possible Repairs You May Have To Make?
Now one thing I want to mention here is that this is a very good overall layout for the general components of an RV motorhome.
But keep in mind that this is not all of your possible expenses on a motorhome.
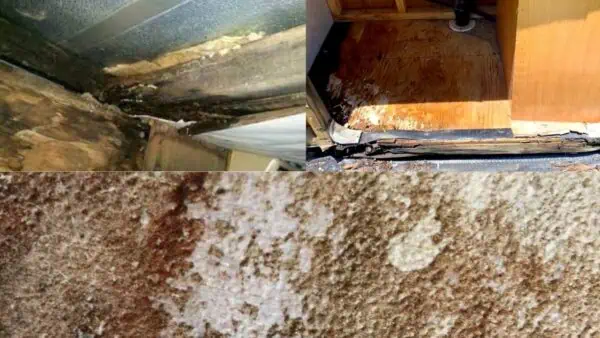
Because there could be also expenses for water leak repairs. Or for replacing your tires regularly.
Or for replacing awnings, and so on. So what we have covered are just some of the major expenses that an RV motorhome can incur.
But I do feel that the graphic provides a pretty good breakdown on the major RV components.
Also notice that there’s a wide range of costs found for each listed component.
That’s because you can’t really nail down something specific for each situation.
There is a lot of variance in repair costs depending on what went wrong.
However I do feel that this graphic is useful. Because it helps you compare repair costs from one component of the RV to another.
So it could be a good idea to use the lower figures they’re giving here as a base for RV repairs.
Or you might choose to use a mid-range of figures in this graphic instead to produce your budget.
And then spread those costs over the years you plan on owning your RV.
RV Costs Associated With Owning A Towable RV
OK, let’s move along to towable RVs like fifth wheels and travel trailers now.
And of course they do not include the engine and drivetrain that motorhomes have.
So let’s take a look at the Wholesale Warranties graphic for those kind of RVs now. Just view the image below for that information.
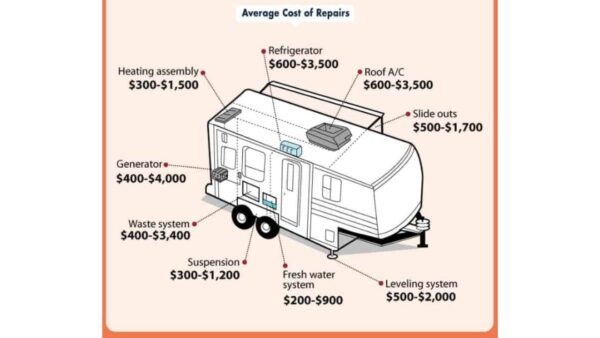
So when you look at this graphic you’re going to notice something right away.
And that is that the costs associated with the house or the RV part of the towable is very similar to the costs of the house part of a motorhome.
That’s because they are similar in makeup. However what you don’t see in this graphic is the engine and drivetrain costs.
But that doesn’t mean that they aren’t still there. And why is that?
Where Are The Engine And Drivetrain Costs With Towable RVs?
Simply because those costs are transferred to the tow vehicle for a towable RV. And that’s often a truck of some type.
Now some feel that towable RVs are less expensive to maintain and repair than motorhomes.
However, you can see that often doesn’t take into account the cost of the tow vehicle’s repairs and maintenance as well.
So you need to add the tow vehicle’s costs in along with your towable RV.
And when you do, the repair and maintenance costs are pretty similar to motorhomes.
But there are a couple of factors that impact maintenance and repair costs.
And these factors are under your control. So let’s talk about that now.
A Huge Factor In Managing RV Costs
One of them is the size of RV that you choose. Because the bigger the RV you have, generally the more expense there’s going to be to care for it.
And the more luxury items and amenities in it, the more there is to go wrong.
For instance, the more slides you have, or the bigger slides you have, the more expense to repair them.
Also, what if you have an RV that has a lot of advanced technology in it?
Well, if a lot of things are controlled digitally in your RV, you may not be able to repair it yourself.
Instead, it may cost you to have someone who’s experienced and knowledgeable to make that repair.
So let me give you a few words of wisdom to remember here about RV costs.
And that is, generally speaking, usually the simpler and the smaller the RV is, the less costs you’re going to have to repair and maintain it.
The Costs Of Owning A Large RV
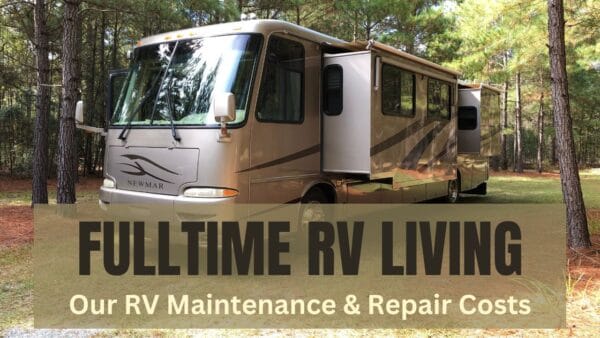
Now the most expensive RVs are often Class A diesel pushers like I own.
In fact, I made a video on that subject a little while back. And I showed how that I had made a projected budget for my repair costs.
However, I found that my projected budget was seriously low. It didn’t really match the actual RV costs that I encountered.
So I feel that it would be good for you view that video and see how that turned out. And you can view it by clicking here or on the image below.
Now the least expensive RVs cost-wise are usually small travel trailers. Ones with just the camping basics built into them.
So if RV costs could be a problem for your budget, decide what size RV will fit your budget. And maybe a smaller one will be best for you.
OK, now let’s talk a little bit about how to keep RV repair and maintenance costs down as much as possible.
The Best Way To Keep RV Repair Costs Low
And the number one thing you can do here is to learn how to repair most things on an RV yourself.
Now here’s the good news. Roughly 80% of things that go wrong on RVs can be fixed by the average owner with a little bit of knowledge.
And that kind of RV repair knowledge can often be found on YouTube these days.
If you do that, it can save you the big expensive hourly rates for labor that an RV facility is going to charge you on those repairs.
How You Can Prevent Many Large RV Repair Bills
Next up is to do your RV maintenance tasks on schedule. Don’t let them slide, or procrastinate them!
By doing that, you will help prevent many major RV problems that could be costly.
OK, let’s move on to number three on the list of ways to keep RV costs low.
How To Manage RV Costs With A Service Contract
And that is, if you want to manage your RV repair costs, you might consider getting a service contract for your RV.
This is also what some people refer to as an extended warranty. And that will help you cover the major repair costs that could come up.
Now personally, I think this makes most sense for those who own more complex and bigger RVs.
And that’s for the simple reason that they have more things to go wrong that could be expensive to repair.
So here I am going to recommend Wholesale Warranties as a good place to start.
And a good reason for that is they have a great reputation among the full-time RVing community.
A Word About Saving Money At RV Repair Facilities
But I also recommend that you choose a highly rated repair facility that’s nearby.
First of all, make sure you can trust them. Then establish a relationship and try to do your business with them exclusively.
Because that way they get to know you, and you get to know them well too. So it eventually becomes a working relationship.
And over the course of time, that kind of thing can lead to their saving you money on RV repairs and maintenance.
Conclusion
Well I hope these tips that I’ve given you will be helpful in managing your RV costs.
And I hope they will help you keep your repair and maintenance costs on your RV as low as possible.
Have safe and happy RV travels!