Azdel vs Luan – The Surprising Truth In This Controversy

This article is going to be talking about Azdel vs Luan in RV construction.

But first, I made a video about how RVs are made. And you can watch that video here.

That video helps to lay a basis or foundation for what we’re going to cover in this article.

That’s because it explained how that many RV manufacturers are using laminated wall building methods for their RVs these days.

Watch my video on Azdel vs Luan

Azdel vs Luan – How Are RV Walls Made?

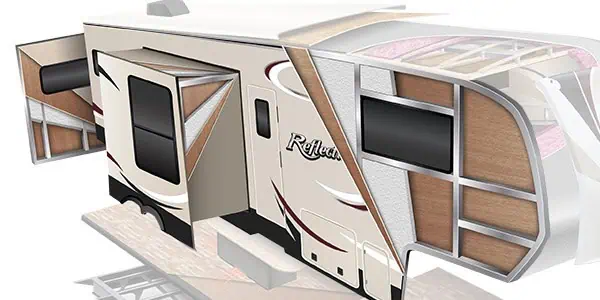
So let me show you what I mean by “laminated walls” in RVs. And as you can see in the following image, there’s a fiberglass panel on the outside of the RV.

An example of laminated RV walls

Then it has a substrate behind it that gives it rigidity. After that, there’s the frame for the wall.

And in between the frame supports is insulation. Finally on the other side of the frame is the interior wall that you see inside the RV.

Now all of those layers are glued together first. And then the whole unit is run through a pinch roller or it’s vacuum bonded together.

So what comes out of that process is one big solid RV wall. There’s no sections to it.

What Is Luan Anyway?

Now for years, the substrate that supports the fiberglass outside panel has been made out of Luan.

So what is Luan anyway? Well, you’ve probably heard the term but just didn’t know what it actually meant.

And the explanation is that Luan is just simply an eighth to a quarter inch plywood board.

Azdel vs Luan - an example of luan plywood panels
An example of Luan plywood panels

It’s very strong but also very light. And therefore it’s a very good RV construction material that has been used for years.

However, it has one big drawback. And that is that if water gets into an RV’s wall, then Luan can begin to break apart.

In fact, it can delaminate away from that exterior wall altogether. And it can even rot inside the wall if the water intrusion goes on long enough.

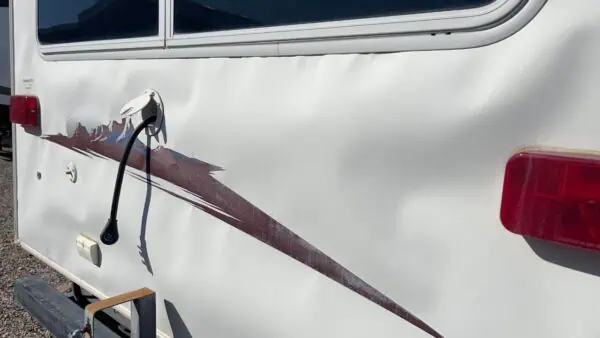
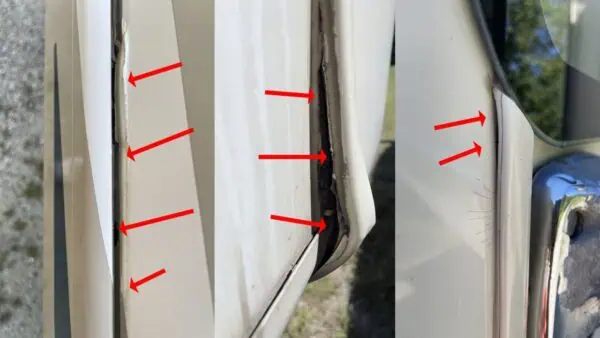
Now how do you spot delamination on an RV? Well just go down to the end of an RV and look back at the sidewall.

An example of extreme delamination on an RV

If you see some blisters or areas where the fiberglass seems to poke out away from the wall, that’s delamination.

And that’s what we really want to avoid!

Azdel vs Luan – Using Azdel In RV Construction

Now since 2006 Azdel has begun to be used in the industry in many cases instead of Luan.

Especially on the RV’s outside walls to prevent delamination. Of course, Azdel started out being used just sparingly by RV manufacturers.

But it’s progressively being used by more and more manufacturers in the construction of RV walls.

And the question is, well then what is Azdel? The answer is that it is actually a composite sheet of material that’s man-made.

And it is impervious to water or humidity. In fact, you can take Azdel and just submerge it in water for months.

Azdel vs Luan - this is how Azdel is used in RV wall construction
This is how Azdel is used in RV wall construction

And if you did it would look just fine when it comes out of the water. That’s because it simply can’t rot!

So does that mean that Azdel solves all RV water intrusion issues then?

Azdel vs Luan – Does Azdel Resolve RV Water Leak Problems?

Well, I often see lots of comments on the internet from RV buyers that think that’s the case.

And so they refuse to buy any RV that has Luan in the RV’s walls. Because they feel that it’s vastly inferior.

And they are concerned that they’re setting themselves up for water problems if Luan is used in the RV walls.

In fact, they may like everything else about an RV. And the manufacturer may be very well known as a quality manufacturer.

But they’re still not going to buy that RV if it has Luan in the walls. So is that a reasonable stance to take?

Well, the reason for this controversy is that RV marketing people do a great job at marketing.

And marketing people want to make you see all the good things about something. But not necessarily any of the bad things.

Or they will tell you all the good things, but don’t give you the whole story. Or all the details about the other things that apply as well.

So if you listen to RV marketing people. it sounds like Azdel in RV walls is the perfect solution for RV water problems.

However let me make this point very clear. Azdel in exterior RV walls alone will not make your RV waterproof.

And it will not solve all of your water intrusion issues. Why is that?

How Extensive Is Azdel Being Used In RV Construction?

Because let’s just suppose that an RV has Azdel in the sidewalls. That sounds like water problems are solved for that RV, right?

Well, there is something that many RV buyers don’t know. And that is that the vast majority of RV builders still use a lot of wood elsewhere in the RV.

You can find it in the roof, the ceilings, the floors, and in the interior walls of the RV.

So if water gets in, it’s true that when it goes down the RV walls it may not delaminate that substrate from the fiberglass panel like Luan would.

But major damage will still happen in that RV wherever wood is being used.

You see, water doesn’t care if Azdel is in your RV or not. No, water just follows gravity and works it’s way down the inside of an RV.

And most RV leaks actually begin from the roof area. Secondly, followed by windows.

Azdel vs Luan – Delamination Is Not The Main Issue Here

Now suppose you have a water leak that starts to come in from the roof. And the water follows gravity from there.

Well first of all, it can and often does ruin the roof supports in the RV’s ceiling.

Then it can go down the sidewalls. And Azdel will probably help to prevent delamination there.

But then water continues on its way down and often ruins the floor as well as the RV’s interior walls.

So the real issue that we have here in RVs is not just delamination. No, the real issue here is water intrusion.

And the need for RV joint and seam maintenance and care on the part of RV owners.

Are The Marketing Claims Being Made Really Helpful?

Now this is nothing that RV marketing people are going to tell you. They’re not going to talk to you about maintaining your RV.

Or that even if the RV has Azdel in the sidewalls, you’ve got to watch the RV’s joints and seams. And keep them covered with the proper sealant.

Oh no, marketing people are not going to inform you of that. They are just going to try to sell Azdel as a water intrusion cure.

But here is the honest truth. There have been many thousands of very good RVs made in decades gone by using Luan and wood construction.

And many of them are still doing just fine. As long as the joints, the seams, and the windows are sealed with proper sealant.

So what if you plan on maintaining your RV? In other words, you’re going to buy an RV and not be one of those people who just doesn’t ever do anything to it.

Instead you’re going to actually try to maintain it and stay up with joint and seam maintenance.

Maintain your RV joints and seams to combat water intrusion

Well if that’s the case, then Luan will work just fine in your RV’s side walls. Or anywhere else in the RV. It’ll be just fine!

What Happens When You Don’t Maintain Your RV’s Joints And Seams

But now what if you don’t plan on maintaining your RV? You’re just going to go on camping trips and run around with it? And that’s the end of your involvement with that RV?

Well then, you could have a lot worse problems than just delamination.

Remember how water follows gravity? So you could be replacing roof substrates.

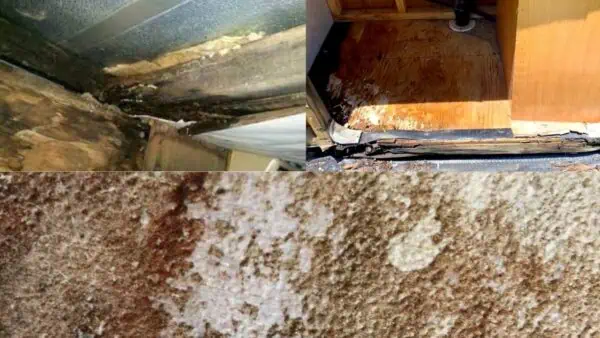
Azdel vs Luan - Water damage on an RV's ceiling
Water damage on an RV’s ceiling

Or you could be replacing flooring or interior walls even if your RV has Azdel in the outer walls.

And all of that is very expensive! Yes your exterior walls could still be laminated just fine due to Azdel.

But all of this other damage can be taking place inside your RV because of water intrusion.

And those things can happen if you are not going to care for the joints and the seams of your RV.

Azdel vs Luan – Am I A Believer In Azdel Or Not?

Now let me say this for all of the Azdel fans out there. I personally believe in Azdel. I am a supporter of the use of Azdel in RV walls.

Yes, I want to see more products like Azdel being used throughout RVs. In the roof, the flooring, and the RV’s interior walls too.

In other words, more inorganic products being used in RV construction can only be a good thing.

However, what about choosing an RV these days solely on whether it has Azdel in the side walls?

Well, it doesn’t match the reality of what is needed to fully combat RV water leaks and damage.

Conclusion

So don’t just buy into the advertising ploys of RV marketing people.

Instead, commit to maintaining your RV. Commit to doing the work that needs to be done to keep water out of your RV.

If you do, your RV will last for years. And it’ll give you great service during the time that you own it.

Whether it has Azdel or Luan in the side walls or not!

Have safe and happy RV travels!

The Top 10 RV Tools That Are Must-Haves For Every RVer

All experienced RV travelers know that having the right RV tools on hand is essential. That’s because RVs constantly need minor repairs.

It’s not hard to understand why when you realize that an RV is a home that is driven down the road. And that means that it’s being shaken and jostled as it goes.

So RVs are subjected to stresses that stationary homes never experience.

That means that screws and bolts often get loose. And sometimes things break. But if you have the right basic tools on hand, you can handle most of these repairs yourself.

So this article is about the kind of tools every RVer should have readily at hand for minor repairs. Let’s get started on the top ten list of RV tools that will be needed.

(Watch my video on this subject by clicking on the image above)

Disclosure: Please note this post may contain affiliate links. This means โ€“ at no additional cost to you โ€“ I earn a commission if you make a purchase using our affiliate links. I only link to products and companies I use and feel comfortable recommending. The income goes toward supporting the free content on this website

#1 – Cordless Drill/Driver

There are lots of screws that are used in the construction of an RV. In fact, that is the one fastener that you will most likely encounter in any repair project.

Of course, you can choose the more labor intensive way and just use a set of screwdrivers if you wish. But having a good cordless drill/driver will make your life so much easier.

And you could just choose a corded one instead. But my experience has been that although it works just fine, it’s more of a hassle to use.

That cord is always getting in the way it seems. And usually it happens at the worst times. So not having to think about managing an electrical cord as you work is great.

It may seem obvious, but don’t forget that you will also need a good assortment of drill and driver bits. The drill/driver is no real help unless it has the bits that go with it.

And finally, there is no need to overbuy this kind of tool. Expensive drill/driver sets are mainly for heavy duty use by professionals. So getting a lower cost quality unit will be just fine for your needs on minor RV repairs.

Cordless drill/driver I recommend

RV tools #2 – Drill/Driver hand tool

You may be wondering why I also recommend having a manual drill/driver after singing the praises of a powered one in the section above.

The main reason it’s a good idea to have one of these tools is to avoid over-tightening screws and fasteners. One of the last things you want to do is strip out a hole where the fastener goes.

And powered drill/drivers can do this very quickly if you aren’t careful.

So I often use the cordless drill/driver to screw in the fastener most of the way. Then I use the hand tool to finish it off.

That’s because you can feel when the fastener is getting tight by hand and then stop. But the powered tool can easily go too far before you know it.

Multi-use hand drill/driver I recommend

#3 – Claw Hammer

Almost any construction or repair project can benefit from having a hammer handy.

And one of the most versatile hammers available is the good old-fashioned claw hammer.

The hammer part of the head is useful for nailing things as well as taking things apart in demolition. It also can be useful for driving stakes in the ground.

The claw part of the hammer is great for removing things that are fastened down.

All in all, it’s a really useful and versatile tool that any RVer should have on hand.

Claw hammer I recommend

#4 – Utility Knife

There are all sorts of minor repairs and projects around an RV that can benefit from using a utility knife.

And there are several kinds of utility knives to be had. But I personally recommend using one that has snap-off blades.

I find that it works well for almost any project around the RV and allows you to have a sharp blade all the time.

Utility knife with snap-off blades I recommend

RV tools #5 – Multi-Tester

If you have any kind of electrical problem or issue on your RV, you will be glad to have an electrical multi-tester to use on it.

A multi-tester is one of the RV tools that proves it’s value over and over again.

It’s not uncommon to have electrical circuit issues on RVs. And diagnosing that kind of problem to find the source can be problematic.

But it’s almost impossible to diagnose these kind of issues without the help of a good electrical multi-tester.

Again, there is no need for a really expensive model if you aren’t a repair expert. And a good, useful multi-tester can often be had for under $75.

Electrical multi-tester I recommend

#6 – Gorilla Tape

Of all the RV tools that you really should have on hand, gorilla tape or duct tape whould be high on the list.

This stuff is so useful for so many kinds of projects around the RV, it’s hard to list them all. In fact, you may find yourself using it more than almost anything else to solve some RV issues.

Even if the RV repair is a temporary one, it usually buys you enough time to arrange for a more permanent repair later on.

So be sure to have a couple of rolls of this kind of tape in your RV tool bag.

Gorilla tape I recommend

Duct tape I recommend

RV Tools #7 – Tape Measure

It seems that I am constantly using a tape measure to find out how much room I have in the RV for something I need.

In fact, a tape measure is useful in almost any project or repair you encounter on an RV.

And it’s a good idea to have them in different sizes. I often keep a smaller 10 foot tape measure inside the RV.

Then for larger projects I have a 25 foot and a 50 foot tape measure in my RV tool bag as well.

25 foot tape measure I recommend

#8 – LED Flashlight

RVs are filled with small, dark places that are hard to see into easily.

So having a good LED flashlight that is small and yet powerful is one of your most valuable RV tools.

I also have different kinds of flashlights too, and I keep them in various places throughout the RV.

That’s because it’s important to have one handy for all sorts of things you do in the RV.

Some of my flashlights have a normal shape, but some are also flat or can be hung up as you use it. Just make sure that one is readily available when you need it.

LED flashlight I recommend

#9 – Ladder

Getting up to the top of an RV is going to be vital. So a good ladder is one of your most valuable RV tools.

Here again, I have more than one kind of ladder for my own use.

I have a very small single step ladder that comes in handy when getting to something just outside my reach.

Then I have a 6 foot step ladder that allows me to access almost any area on the sides of my motorhome.

And then I have a foldable ladder that can be converted from a step ladder into a straight ladder. And it is long enough that I can even use it to get on the roof of my RV if needed.

The key to buying a ladder for use around an RV is to get one that is as light as possible. Usually this means either a fiberglass or aluminum ladder.

Aluminum ladder I recommend

RV Tools #10 – Socket and Wrench Set

Just as there are all kinds of screws used as fasteners around an RV, you will also encounter lots of bolts and nuts too.

This means that you must have a good socket and wrench set to handle these kind of fasteners.

These days it is a good idea to have both SAE and metric sockets and wrenches to be sure that you have the right tool on hand.

Of course, then you need to choose the size of the socket set too. The main choices are 1/4, 3/8, and 1/2 inch drive sets.

1/4 inch drive sockets can work for many small RV projects. But if you want a good overall size, 3/8 inch sets are probably the most useful for RV projects.

And 1/2 inch drive is usually too bulky for most standard repairs on an RV.

I know that a lot of RVers just grab an adjustable wrench when they encounter a nut or bolt. But an adjustable wrench can easily round off the heads of the nuts if you aren’t very careful.

So it’s better to take the time to find the correct size socket or wrench and do the job right.

Socket and combination wrench set I recommend

(These are affiliate links for the product on Amazon. It does not cost you any extra to buy the product using my affiliate link if you choose to do so)

Conclusion

The list of RV tools that I just provided in this article is by no means an exhaustive list.

But it is the list of tools that I find myself using more often than most other tools.

So if you feel that you want to try to handle most small and minor RV repair projects on your rig, this list is a good place to start.

How To Defrost An RV Refrigerator The Simple And Easy Way

If it’s time to defrost an RV refrigerator in your rig, don’t feel bad. Frost often builds up inside RV freezers and refrigerators.

And when it does you will have to get rid of it eventually when it starts affecting the performance of the refrigerator.

Residential refrigerators have advanced to the point where almost all of them are frost-free. So why do so many RV refrigerators have to be defrosted manually?

Watch my video on how to defrost an RV refrigerator and freezer

Well, the problem is much worse in the summer months, when the air is hot and humid. And opening the fridge doors a lot will allow the hot and humid air inside.

Then the moisture can stick to the sidewalls of the freezer and the fins in the refrigerator.

Another common cause of frost building up inside RV refrigerators is the size of the units themselves. Most RV refrigerators are much smaller than we may be used to using at home.

And because they are smaller we all like to pack as much food inside as we can to have our normal foods available whenever we want them.

But packing food into an RV fridge decreases the air flow inside of it. And this in turn makes the chances of frost buildup much greater.

So the frost keeps building up inside. When it reaches the point where the freezer and refrigerator is not cooling as well as it should, it’s time for action.

So here is how to defrost an RV refrigerator. And how to defrost an RV freezer at the same time!

PLEASE TAKE MY SURVEY ABOUT RV REFRIGERATORS

The Safest Way To Defrost An RV Refrigerator

The absolute safest way to defrost an RV refrigerator is to turn it off and remove all of the food inside. This means both the freezer and the refrigerator.

How to defrost an RV refrigerator
The safest way to defrost a fridge is to open all doors completely

Then you simply open all of the doors to the fridge and leave them open until the frost is gone. Of course, this can take a long time.

So it calls for a lot of insulated bags to store your food items in while the refrigerator defrosts.

But there is one big advantage to this long way of defrosting refrigerators. And that is that you cannot possibly harm anything by doing it this way.

That’s right, just letting air inside your RV refrigerator to warm the ice to the point that it defrosts is totally safe.

But it is also time-consuming and takes up a lot of space for the food being kept cool while the fridge defrosts.

So is there a better and faster way to defrost an RV refrigerator? The answer is yes!

Before You Defrost – A Warning

When you open up the freezer door and see ice that has caked to the walls, it will be tempting to chip it off.

But that is the worst thing you can do. You can do a lot of damage easily by using anything metal inside the refrigerator.

Some RV owners have punched a hole through the walls of their refrigerator. This can easily happen by using things like an ice pick, a fork, or a screwdriver on the ice.

Don't use sharp metal objects when you defrost an RV refrigerator
Don’t use sharp metal objects inside the refrigerator

These RV refrigerators are very versatile but they are not built to withstand the use of metal objects on their walls to clear ice. So don’t even think about it.

And truthfully, there are other methods that are faster, more complete and much safer for your fridge.

In fact, I will show you the process that we use to defrost an RV refrigerator now, and it’s much safer. It is also very easy to do and doesn’t take much time.

Most of the time we can defrost our RV freezer and refrigerator in about 30 minutes from start to finish.

It’s how we defrost our Dometic RV refrigerator. But you can use the same process for defrosting a Norcold RV refrigerator too.

And we have a full size refrigerator, so if you have a smaller one it may go even faster.

So here is how we do it –

How We Defrost An RV Refrigerator

The first step is to turn off the refrigerator. Then we begin heating two pots of water on the stove.

How to defrost an RV freezer - use pots of hot water
We start heating pots of water on the stove

Then we remove all of the food items from the freezer. We don’t leave anything in there while we are defrosting it.

We also remove food items from the refrigerator in front of the cooling fins. And any food that could be temperature sensitive like yogurt, mayonnaise, etc. too.

We leave the rest of the food where it is in the refrigerator though. There is no need to completely unload the refrigerator compartment.

We then put all of the frozen food and the refrigerated food in insulated bags to keep them cold.

And we usually add some blue ice to the bags to help keep the food cold while defrosting the fridge.

Defrost an RV freezer using insulated bags to store the cold food
We put all the food in insulated bags with blue ice

Then we place some towels on the floor and shelf of the freezer compartment. These towels accomplish a couple of important things.

First, they keep the hot pots from damaging the freezer floor or shelf. And second, they also absorb water from the freezer walls as they thaw out.

Using Hot Water Inside The Fridge And Freezer

When the water is hot, we put the pots in the freezer on the towels and close the door. The water does not have to be boiling, just hot enough to melt the ice.

Defrost an RV freezer - put towels under the hot water pots
We put the pots of hot water on the towels in the freezer

It usually takes about 15 – 20 minutes for the hot water to defrost the RV freezer compartment completely.

It also usually thaws the fins in the fridge compartment by then as well.

When everything is thawed, we remove the pots and towels. And then is when we wipe down the walls of the freezer with towels until it is dry.

Then we turn on the refrigerator. As soon as it’s starting to cool again, we reload the freezer and refrigerator. And we are done!

Click here to watch our video about defrosting an RV refrigerator

What If Additional Defrosting Is Needed?

Occasionally, the refrigerator fins do not thaw as quickly as the freezer though. So we have another procedure to solve that issue.

In this case, we use a hair dryer on the low setting and aim the warm air toward the refrigerator fins.

But we always keep the hair dryer nozzle a safe distance away from any of the fridge walls or fins.

And it’s also very important to keep the nozzle of the hair dryer moving at all times. We never let it stop in one place very long.

That makes sure that nothing in the refrigerator gets overheated.

It usually only takes a few minutes to finish thawing out the fins with this method. Then we go ahead with our reloading procedure.

How to defrost an RV refrigerator - clean ice of the refrigerator fins
Sometimes the fins require more work to help them defrost

Conclusion

The whole process is not hard to do. It just takes a little time, as I said about a half hour for us.

It’s the easiest way I know to be able to defrost an RV refrigerator. And also defrost an RV freezer too.

Once again, the absolute safe way is to just open the refrigerator and freezer, and take everything out. Then leave the doors open until thawing is completed.

But we have followed the procedure I mentioned above several times and have never had any problems.

We always use common sense and are careful with hot water. If you choose to try this method, go slow the first time and keep safety first.

Have safe and happy travels!