
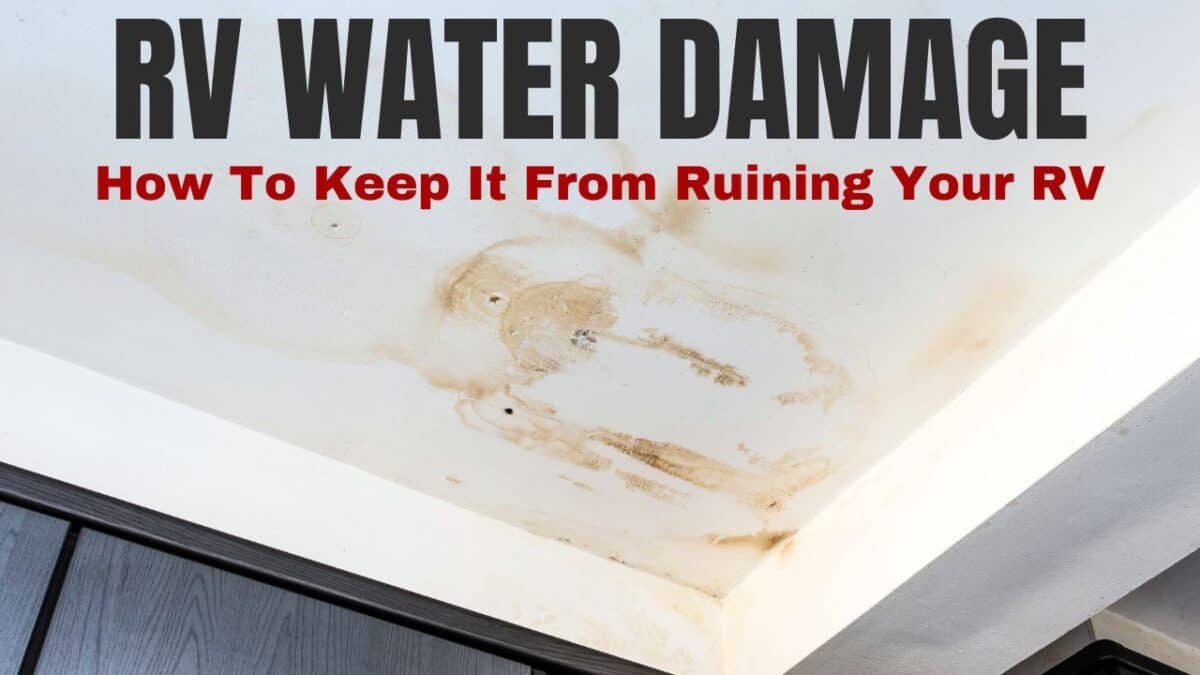
RV water damage is one of the most serious—and expensive—problems an RV owner can face. But the trouble is that it often begins quietly.
You may not see water dripping from the ceiling or running down a wall. In fact, by the time an obvious stain or soft spot appears, moisture may have been working its way through the RV for quite a while.
So water intrusion deserves your attention throughout the life of your RV. A small opening in a roof seam, window seal, or exterior joint can allow water into places that are difficult to see and even harder to repair.
Then, over time, that moisture can damage walls, ceilings, floors, insulation, adhesives, and structural materials.
However, the good news is that RV water damage is often manageable when a leak is caught early.
And better yet, many leaks can be prevented through regular inspections and timely sealant maintenance.
So in this article, we will look at why RV water damage is so serious, where leaks commonly begin, how to recognize the warning signs, and what you can do to protect your RV.
You can also watch my video about RV water damage by clicking the image below.
Quick Answer: How Serious Is RV Water Damage?
RV water damage can range from a minor repair to a problem so extensive that the RV is no longer worth fixing.
The difference usually comes down to how much water entered, where it traveled, and how quickly the leak was discovered.
If you catch an RV water leak early, stop the source, and dry the affected area properly, the damage may be limited.
However, a leak that continues unnoticed can lead to rotted wood, soft floors, damaged ceilings, mold concerns, and RV delamination.
So the best defense is simple: inspect the seams, joints, roof components, windows, and sealant on the outside of your RV regularly.
At the same time, examine the walls, ceilings, cabinets, and floors inside for stains, softness, swelling, or unusual odors.
Why Is RV Water Damage So Expensive to Repair?
At first, a small crack in some sealant may not seem especially threatening.
Unfortunately, water does not always remain near the place where it entered.
Instead, it can follow framing, wiring, insulation, wall panels, and gravity before it finally produces a visible symptom.
So the stain you see inside the RV may not be directly below the actual leak.
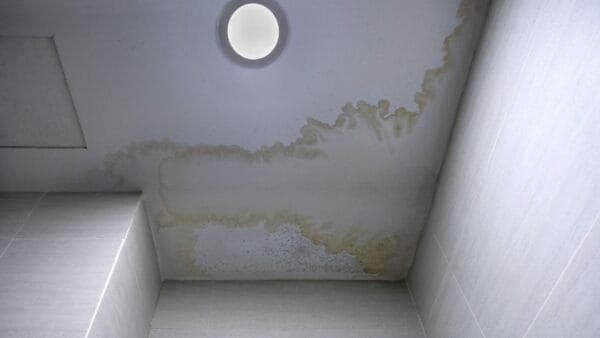
Finding the source can take time, and reaching the damaged materials may require removing other parts of the RV.
RV Roof Damage Can Require Major Disassembly
For instance, suppose a failed roof seam allows water beneath the roof membrane.
Correctly repairing the resulting damage may involve much more than applying new sealant over the visible area.
Depending on the construction and the extent of the problem, a repair facility may need to lift or peel back part of the roof membrane.
And roof-mounted components, such as an air conditioner, vent, skylight, or antenna, may also have to be removed.
In addition, wet insulation or damaged roof decking may need replacement before the roof can be put back together.
That process requires labor, time, and considerable care. Therefore, a leak that began with a small sealant failure can turn into a substantial repair bill.
Wall Damage Can Lead to RV Delamination
Many modern RV walls are laminated assemblies. In other words, several layers are bonded together to form one wall panel.
But when water penetrates that assembly, it can weaken the adhesive and cause the outer fiberglass skin to separate from the material behind it.
This condition is called RV delamination. From the outside, it may look like a bulge, wave, ripple, or large bubble in the sidewall.
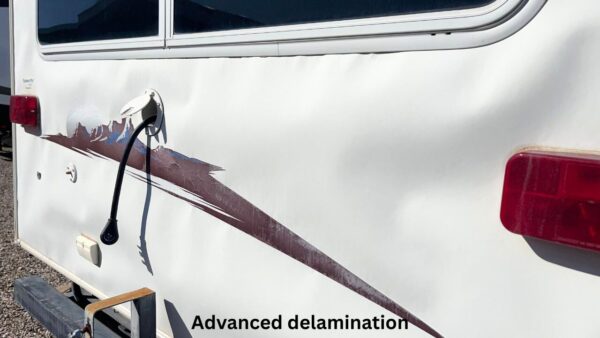
Now, minor surface irregularities are not always caused by water damage, so appearance alone does not provide a complete diagnosis.
Nevertheless, a suspicious bulge—especially near a window, roofline, corner, or exterior seam—should be investigated.
Once a large area of a laminated wall has separated, repairing it correctly can be difficult and costly.
And in some cases, replacement of a large wall section may be the only dependable solution.
If you’re wondering how wall materials affect water damage, my Azdel vs Luan comparison explains what each material can and cannot do.
RV Floors Often Become the Final Collection Point
Water naturally travels downward. So a leak that begins at the roof, a window, or a sidewall seam may eventually reach the floor.
But by then, moisture may have passed through several hidden layers, and it can damage floor coverings, underlayment, subflooring, insulation, and structural supports.
So repairing that damage may require removing furniture, cabinets, appliances, or interior walls simply to reach the affected area.
This is one reason a soft RV floor should never be ignored. It may indicate that the problem has been developing longer—or extends farther—than the visible area suggests.
How Does Water Get Into an RV?
Now, to understand RV water leaks, it helps to understand how an RV is assembled.
In simplified terms, the manufacturer begins with a frame and installs the floor.
The walls are attached, and then the roof is placed on top. Wherever these sections meet, there is a joint or seam that must be sealed against the weather.
But that is not all. Manufacturers also cut openings for windows, doors, storage compartments, vents, skylights, plumbing fixtures, air conditioners, antennas, and other equipment.
And each opening creates another place where a seal can eventually fail.
Of course, an RV also flexes and moves as it travels. Heat, cold, sunlight, rain, vibration, and normal road movement continually affect its exterior materials.
So even a properly sealed RV will need ongoing inspection and maintenance.
The Most Common Places for RV Water Leaks
Although water can enter almost anywhere the exterior has been penetrated or joined, some areas deserve especially close attention.
So let’s look at the most common trouble spots.
Roof Seams and Roof-Mounted Components
The RV roof contains numerous potential entry points. These commonly include:
- Front and rear roof seams
- Roof edges and termination points
- Air conditioners
- Plumbing vents
- Roof vents and vent fans
- Skylights
- Antennas and satellite equipment
- Solar-panel mounting points
- Ladder attachment points
Manufacturers usually apply a self-leveling lap sealant around horizontal roof openings and seams.
As the name suggests, this sealant spreads after application and forms a broad protective layer.
It works very well when it is compatible with the roof material and applied correctly.
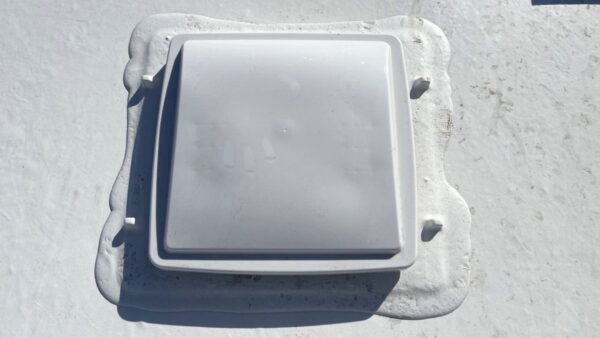
However, it does not last forever, and cracks, gaps, lifting edges, separation, or missing sealant can eventually create a path for water.
Front and Rear Cap Seams
Where the sidewalls meet the front or rear cap, there is normally a vertical joint.
These areas may be exposed to wind-driven rain while the RV is moving or parked.
Because the surface is vertical, a non-sag sealant is generally used rather than self-leveling lap sealant.
After all, you want the sealant to remain where it is applied instead of running down the sidewall.
Pay close attention to the upper corners and the points where these vertical seams meet the roofline.
Several sealed joints may come together in a relatively small area.
Windows, Doors, and Compartment Openings
RV windows are another common source of water intrusion. A window may not have been bedded or tightened correctly when installed.
So over time, its sealing materials can also dry out, shrink, separate, or lose adhesion.
Water may enter around the upper or side edge of the window, travel behind the interior wall panel, and then collect near the bottom.
So, in some cases, the first noticeable symptom is a stain or soft area below the window rather than water around the window frame itself.
Entry doors, baggage doors, exterior access panels, utility compartments, and slide-out openings should receive the same kind of attention.
Exterior Lights, Attachments, and Small Penetrations
Smaller exterior items are easy to overlook, but they matter too.
Clearance lights, awning brackets, grab handles, vents, speakers, cameras, cable connections, and exterior outlets all require holes or fasteners in the RV.
Any one of those openings can allow water inside if its seal fails. During an exterior inspection, do not focus only on the large roof components.
Look closely at every attachment and penetration.
Why RV Sealant Eventually Fails
Sealant has a difficult job. It is expected to remain waterproof while being exposed to ultraviolet light, temperature changes, rain, dirt, cleaning chemicals, flexing, and vibration.
Eventually, even good RV sealant will age. It may become dry, cracked, loose, thin, or brittle, and the failure may begin as a tiny opening that is easy to miss.
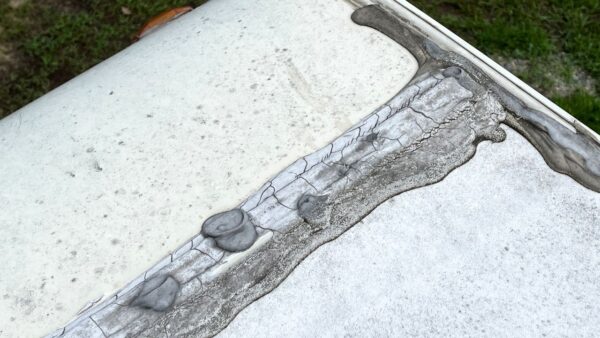
Now, factory-applied sealant may perform well for quite some time, but owners should not assume that a relatively new RV cannot leak.
Installation problems, movement, accidental damage, and material defects can create an issue earlier than expected.
Can You Apply New Sealant Over Existing RV Sealant?
Sometimes deteriorating sealant can be cleaned and touched up before it fails completely.
So if the existing material is still firmly attached, compatible with the new product, and in generally sound condition, a carefully prepared repair may extend its useful life.
However, new sealant should not simply be piled over dirty, loose, or badly deteriorated material.
If the old sealant has separated, cracked extensively, or reached the end of its service life, then it may need to be removed and replaced.
If so, always use a sealant approved for the specific surface and application.
An RV roof may be made from EPDM, TPO, PVC, fiberglass, aluminum, or another material, and not every sealant is compatible with every roof.
Also, a product intended for a horizontal roof surface may not be appropriate for a vertical wall seam.
If you are uncertain, consult the RV manufacturer, roof-material manufacturer, sealant manufacturer, or a qualified RV technician before applying anything. If recoating is appropriate after any needed repairs, compare the roof coating options before choosing a product.
How Often Should You Inspect an RV for Water Leaks?
There is no single schedule that fits every RV and every climate, so the manufacturer’s maintenance instructions should always take priority.
As a practical habit, however, give the exterior a close inspection at least several times each year and after events that may have stressed or damaged it.
Good times to inspect include:
- Before and after a long trip
- At the beginning and end of a camping season
- After severe wind, hail, falling branches, or other storms
- After an RV has been stored for an extended period
- Before the rainy season
- After service involving a roof or exterior component
And a quick visual check can be performed much more often. If you are already washing the RV or preparing for a trip, take a few extra minutes to look for changes.
But keep in mind that walking on an RV roof may be unsafe, and not every roof is designed to support the same weight.
So follow the manufacturer’s guidance. If you cannot inspect the roof safely, have a qualified person do it for you.
Warning Signs of Hidden RV Water Damage
Of course, finding water pouring into an RV is easy. But catching a slow, hidden leak requires more attention.
Check the Interior Walls and Ceiling
Every few months, walk through the RV and look closely at the walls and ceiling.
Use your hand to apply gentle pressure in different areas, especially around windows, corners, cabinets, roof vents, skylights, and exterior seams.
Watch and feel for:
- Soft or spongy areas
- Brown, yellow, or dark stains
- Bubbling or wrinkled wall coverings
- Swelling around trim or panel joints
- Peeling material
- Dampness or unexplained condensation
- Musty or unusual odors
And do not forget the areas inside upper cabinets and closets, because those enclosed spaces can hide evidence of a roof or wall leak.
Walk the Entire Floor
It’s best to slowly walk over as much of the floor as you can reach.
And pay particular attention near:
- Entry doors
- Slide-outs
- Windows
- Toilets and showers
- Sinks and water heaters
- Refrigerators with exterior access panels
- Corners and exterior walls
Now, a soft spot does not automatically prove that an exterior leak is present.
Plumbing leaks, condensation, appliance leaks, and previous damage are also possibilities.
Still, any change in the floor deserves prompt investigation.
What Should You Do If You Find an RV Water Leak?
First, stop additional water from entering if you can do so safely. A temporary weatherproof covering may help until a proper repair can be made.
However, avoid using products that could damage the roof or make the permanent repair more difficult.
Next, identify the actual source, but do not assume the leak began directly above the stain.
Remember, water may travel a surprising distance before becoming visible.
Then determine the extent of the moisture and damage, because materials that appear dry on the surface may still hold water underneath.
Depending on the situation, a qualified RV technician or inspector may use moisture-detection equipment and other methods to evaluate hidden areas.
Finally, repair the entry point with the correct materials and address everything that became wet.
Otherwise, simply sealing the outside without evaluating the interior can leave moisture, weakened materials, or mold-related concerns behind.
If the repair involves structural damage, electricity, a large section of roofing, substantial delamination, or an uncertain leak source, professional help is usually the wise choice.
How to Prevent RV Water Damage
Now, preventing every possible leak may not be realistic, but you can greatly reduce your risk and limit the damage by developing a consistent routine.
1. Inspect Seams, Seals, and Sealant Regularly
Look at every roof penetration, roof edge, cap seam, window, door, compartment, and exterior attachment.
Compare the condition from one inspection to the next.
Taking dated photos can be helpful. They provide a record and make gradual changes easier to recognize.
2. Use the Correct RV Sealant
Do not assume that any household caulk will work. Instead, choose a product compatible with the RV surface, the existing sealant, and the location where it will be used.
Proper cleaning and preparation matter just as much as the product itself.
Follow the manufacturer’s instructions for surface preparation, temperature, curing time, and application thickness.
3. Investigate Small Changes Promptly
A faint stain, slight odor, tiny crack, or mildly soft area may be easy to dismiss.
However, those early warning signs are exactly what you want to find because they give you a chance to act before the damage spreads.
The cost and difficulty of an RV water-damage repair often rise as moisture spreads.
Prompt attention can be the difference between a sealant repair and the replacement of a roof, wall, or floor section.
4. Inspect Both Outside and Inside
An exterior inspection helps you find places where water might enter, while an interior inspection helps you determine whether water may already have entered.
So you really need both. Looking only at the roof can miss a window or sidewall problem, but looking only inside can allow an exterior seal to deteriorate until damage becomes visible.
5. Consider Professional Leak Testing When Needed
If you suspect a leak but cannot locate it, or if you are evaluating a used RV, a professional inspection may be worthwhile.
Depending on the provider and situation, testing may include moisture readings, detailed roof and seal examinations, or controlled pressure testing designed to reveal exterior leak points.
Of course, no test replaces good maintenance. However, a professional evaluation can help uncover problems that are not obvious during a casual walk-through.
Frequently Asked Questions About RV Water Damage
Can a small RV water leak cause serious damage?
Yes. The size of the visible leak does not always indicate the amount of hidden damage because a slow leak can continue for months and spread through a wall, ceiling, or floor before it becomes obvious.
On the other hand, a small leak caught and repaired quickly may cause very little lasting harm.
What are the first signs of water damage in an RV?
Common early signs include stains, musty odors, soft wall or ceiling panels, swollen trim, peeling wall coverings, damp cabinets, soft flooring, and cracked or separated exterior sealant.
Delamination or bubbling on a fiberglass sidewall may also be a warning sign.
Does RV delamination always mean water damage?
No. Delamination can have more than one cause, including manufacturing or adhesive problems.
However, water intrusion is a common cause, so it should be investigated—particularly when the affected area is near a roofline, window, light, compartment, or exterior seam.
Can RV water damage be repaired?
Often, yes. But the practicality and cost of the repair depend on its location, extent, and the RV’s construction.
Early damage may require drying, resealing, and replacement of a limited amount of material.
However, extensive structural rot or wall delamination can be much more difficult and may exceed the value of the RV.
Should all old RV roof sealant be removed before resealing?
Not necessarily. Sealant that remains firmly bonded and compatible may sometimes be cleaned and properly covered or touched up.
Loose, contaminated, badly cracked, or deteriorated sealant may need to be removed.
Follow the applicable manufacturer instructions, because the correct procedure varies by roof and sealant type.
How can I check an RV floor for water damage?
Walk slowly across the floor without shoes and feel for areas that flex, dip, or seem softer than the surrounding floor.
Look closely near exterior walls, windows, slide-outs, doors, plumbing fixtures, and appliances.
A professional evaluation is recommended if you find a suspicious area.
Is a water-damaged RV worth buying?
That depends on the confirmed source, scope of damage, quality and documentation of any repairs, purchase price, and the risk you are willing to accept.
Never rely only on a seller’s explanation that a leak was “fixed.” Consider an independent professional RV inspection before making a purchase decision.
Conclusion: Early Detection Is the Key
Water intrusion is one of the greatest threats to an RV because it can remain hidden while damaging materials that are difficult and expensive to reach.
Roof assemblies may have to be opened, laminated walls can separate, and floors can become the collection point for leaks that began somewhere else.
But RV water damage does not have to become a disaster. In many cases, the seriousness of a leak depends on how quickly you discover it and what you do next.
So inspect the outside of your RV regularly, and pay close attention to roof components, seams, windows, doors, compartments, lights, and other penetrations.
Then inspect the inside as well, looking for stains, odors, swelling, delamination, and soft areas in the walls, ceiling, and floor.
Most importantly, do not ignore small changes. After all, a minor sealant problem addressed today may prevent a major structural repair later.
So by staying vigilant and taking action early, you can protect the value of your RV and help it provide many more years of safe and happy travel.
Have safe and happy travels, my friend!