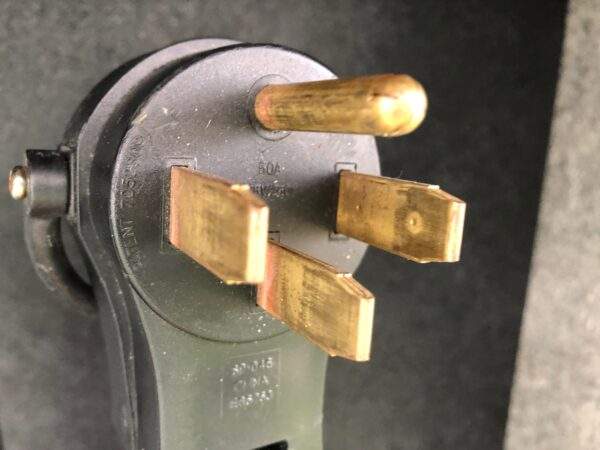
There is often confusion about what happens when you try to use a 30 amp to 50 amp adapter (sometimes called a “dogbone”) at a campground pedestal. Actually, there is confusion when any adapter is used to adjust the electricity provided to an RV.
But in this article we will discuss whether or not you should use a 30 amp to 50 amp adapter. And we will explain what happens when you do.
Disclosure: Please note this post may contain affiliate links. This means – at no additional cost to you – I earn a commission if you make a purchase using our affiliate links. I only link to products and companies I use and feel comfortable recommending. The income goes toward supporting the free content on this website.
A 50 Amp RV Electrical Service – What Does It Mean?
If you have an RV with a 50 amp electrical service it means that you have a thick and heavy electrical cord. And at the end of that cord you have a 4 prong 50 amp plug. So what does all those prongs do? And why is the cord so heavy?
A 50 amp RV electrical service comes with 2 wires that are rated to supply 50 amps of power to the RV. Then there is also a neutral wire and a ground wire.
That makes up all four prongs on the plug. And because wires that are rated to carry 50 amps are large, the cord becomes very heavy.
Essentially, you have 2 legs of 50 amp electrical service going into the RV. That is a lot of power. And if you multiply the amps by the total volts, you get the total power available to you in watts.
In other words, the wattage figure that you get tells you how much power can be consumed at one time safely. So two legs of 120 volts equals 240 volts.
If we multiply that by 50 amps that each leg can carry, that leaves us with 12,000 watts. This means that a 50 amp RV electrical service can run devices that total up to 12,000 watts of power simultaneously.
And in the real world that means that you can run a lot of devices and appliances without overloading the service.
30 Amps To 50 Amps – What Happens?
So when you plug your 4 prong 50 amp power cord into a 3 prong 30 amp service, what happens? Well obviously, one leg of power has been taken away.
This is because all electrical services need a neutral and a ground wire. And the positive wire has been stepped down to using only 30 amps at the pedestal.
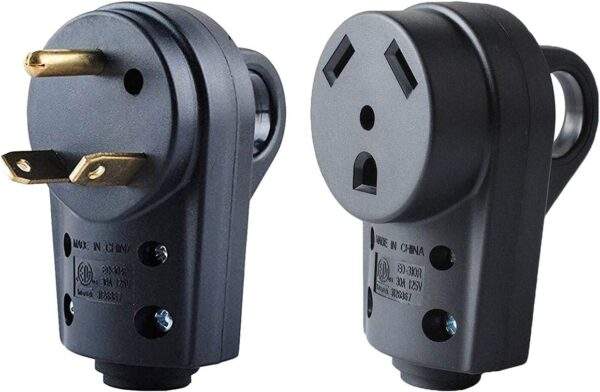
A comparison of the 4 prong 50 amp plug and the 3 prong 30 amp plug
So does this create any problems for your 50 amp RV electrical service? Not at all. This is because the adapter adjusts the power going into your RV to use only 30 amps.
And since 30 amps is lower than 50 amps, nothing will be overloaded. This is because the wiring used for 50 amps is much larger than what is used for 30 amps.
If someone tried to run 50 amps through 30 amp wires, that could be a problem! But not the other way around.
30 Amps To 50 Amps – What’s The Difference?
So it is safe to use 30 amps of power going into an RV that has a 50 amp electrical service. But what does that mean in power usage?
Well, now you only have one leg of 30 amp power times 120 volts. And that means that your total usable power at one time is only 3600 watts. What a drop in simultaneous usable power.
So for an RV that has a 50 amp service, you probably have a lot of power hungry appliances. You may have 2 or more air conditioners, a microwave, a washer/dryer setup, and more.
If you now only have less than a third of the usable power going into the RV, adjustments must be made. This means that you probably can only safely run one air conditioner at a time.
And you may have to limit how many other power hungry devices you use simultaneously. In many cases you can still use them, just not all at once.
It may take a little fiddling around with to determine what can be used and when, but you will eventually get it. Every RV is a little different, so you will learn where the limits are for your particular rig.
Obviously if the main power fuse is tripped, you have gone too far. So it’s best to try to stay on the conservative side to prevent that from happening in the first place.
(This is an affiliate link for the product on Amazon. It does not cost you any extra to buy the product using my affiliate link if you choose to do so)
I hope this has cleared up some of the confusion about RV amp ratings in the RV and at the pedestal.
RV stripes and graphics can make a plain RV look fabulous. And if they are painted on the RV you just have to maintain the painted RV surface.
But if the RV stripes and graphics are made from vinyl material they will eventually wear out. This is becausethe sun’s UV rays dry out and crack the vinyl exposing the adhesive underneath.
An example of old RV stripes and graphics that are peeling away and leaving the adhesive behind
So how do you remove old RV stripes without investing a ton of time and energy? Well I am going to show you 2 methods of RV stripe removal that will make the job much easier.
Disclosure: Please note this post may contain affiliate links. This means – at no additional cost to you – I earn a commission if you make a purchase using our affiliate links. I only link to products and companies I use and feel comfortable recommending. The income goes toward supporting the free content on this website.
Remove Old Stripes With Heat
If you try to remove old vinyl stripe material without heat, you are in for a difficult project. But if you use a heat gun like the ones often used to remove wallpaper, it gets much easier.
And it doesn’t have to be an expensive heat gun either. Even a cheap model will produce enough heat for the job at hand.
Just be sure to keep the heat gun moving to prevent problems. One problem is that you don’t want to damage the RV surface under the stripe.
And you also want the stripe to become flexible enough to remove but not too hot where it almost melts.
But when you remove the stripe with heat, most likely it’s going to leave the old adhesive behind. And this is where the going gets really tough.
Removing The Adhesive Afterward
Many RVers use all sorts of products to remove the adhesive. Everything from mineral spirits to lacquer thinner.
None of these products work very well though, so some just give up and use a razor blade instead.
But using a razor blade is almost impossible to control well. And it’s very easy to begin digging into the RV surface instead of just the adhesive.
But the professionals use products that work much better than these methods. And they are much easier on the RV surface.
For several years I have used a product called “Rapid Remover” by RapidTac. It is not made to remove the vinyl stripe, just the adhesive it leaves behind. And it does an outstanding job of that.
Just spray it on the stubborn adhesive left after the graphic is removed, and wait a few minutes for it to soak in. Then you can remove the adhesive with a plastic squeegee and a paper towel.
You can also use plastic blades instead but you have to be very careful if you do.
Using Rapid Remover will still take some effort but nowhere near the time and poor results of other methods.
(This is an affiliate link for the product on Amazon. It does not cost you any extra to buy the product using my affiliate link if you choose to do so)
RV Stripe Removal With a Steam Machine
Another great way to heat up the old stripes and get them pliable enough for removal is to use a steamer. It can be just a regular household steamer to do the trick.
The idea is to run the steam nozzle over the RV stripe or decal several times in a small area. Eventually you will notice it becoming easy to pick up by the edge and remove.
There are many people who have done this kind of work that actually prefer the steam machine to the heat gun.
Many feel that the steamer’s moist heat helps lift both the stripe material and the adhesive at the same time in many cases. Thus making the job much quicker.
The choice is yours but the heat gun is a much less expensive alternative to the steamer. So it may be best to try the heat gun first and use the steamer only if necessary.
And you can probably rent a steamer instead and save the cost of buying it if the job is small enough.
(This is an affiliate link for the product on Amazon. It does not cost you any extra to buy the product using my affiliate link if you choose to do so)
Remove RV Stripes With A Decal Eraser Wheel
Another professional method for removing old RV stripes and graphics is to use a decal eraser wheel.
These have been in use for several years now and they can make a difficult job much easier.
They will not only remove the vinyl decal but the wheel will also take off the adhesive at the same time. This makes it a real time saver!
The decal eraser wheel simply attaches to any household drill and uses the power of the drill to do its work.
You can’t use it on plastic surfaces or painted aluminum. But it’s safe to use on most other painted metal surfaces.
Just test on an inconspicuous painted area first, just to be sure that you won’t be doing any damage to the paint.
This product alone can turn days of drudgery into a much smaller project in no time.
If any adhesive residue is left over, the Rapid Remover product listed above can take care of that easily too.
If you have a very large stripe or decal it may still take a while to get through them. But the savings in effort and time will be very noticeable by using this method.
(This is an affiliate link for the product on Amazon. It does not cost you any extra to buy the product using my affiliate link if you choose to do so)
When To Remove Old RV Stripes And Decals
Unfortunately, I have seen many RVers wait until their old stripes and decals are heavily cracked and faded before doing anything. That is a big mistake!
When vinyl stripe material starts to crack and fade, the sooner you get it off the better.
This is because as time goes by, the vinyl cracks become worse and the pieces of material become smaller.
Then it takes much more effort to remove them no matter what method you use. So don’t procrastinate on failing RV stripes and decals.
Get them off quickly when it is obvious that they will need to be removed.
However, if you want to make your RV stripes and decals last as long as possible,I recommend using 303 Aerospace Protectant on a regular basis. This product is an exceptional UV inhibitor.
And it prevents the sun’s UV rays from doing much of its damage if you use it often enough. I recommend applying the product at least once a month on vinyl RV stripes and graphics.
If you do, you can extend the life of your RV decals considerably.
(This is an affiliate link for the product on Amazon. It does not cost you any extra to buy the product using my affiliate link if you choose to do so)
I hope you learned something valuable from this discussion of how to remove RV stripes and graphics that are old and peeling.
And if you have any additional suggestions on how to take care of failing stripes and decals, please tell us in the comments below.
Maybe you have been wondering “What is the difference between a 30 amp vs 50 amp RV electrical service anyway?“
But if you are like most people, these electrical terms just get confusing after a while.
Well in this article, I want to help you understand the overall differences. That way you will know what kind of electrical service you need for your own RV.
And you will be better prepared to make the choice between a 30 amp vs 50 amp RV.
Watch my video on 30 amp vs 50 amp – what does it mean?
Probably the best way to help explain these RV electrical terms is to use the illustration of a water hose.
All water hoses conduct water. But some hoses are bigger than others and therefore can conduct more water.
Think of the difference between a regular garden hose and a fire hose. Obviously the fire hose has much greater potential for moving water through it at one time.
And to get water to go through the hose you need some water pressure behind it. The more pressure behind the water, the faster the water goes through the hose.
But the size of the hose determines how much water eventually comes out at the hose end.
Now using that illustration think of the volts as the water pressure. Then think of the amps as the size of the water hose.
The volts that we plug into at an RV campground is supposed to be 120 volts at all times.
So how do we get more usable electricity for our RVs? We have to use an RV electrical wiring system that can carry more electricity.
In other words, we need to make the hose bigger somehow. And how do we accomplish that?
A 30 Amp RV Outlet – How Much Electricity?
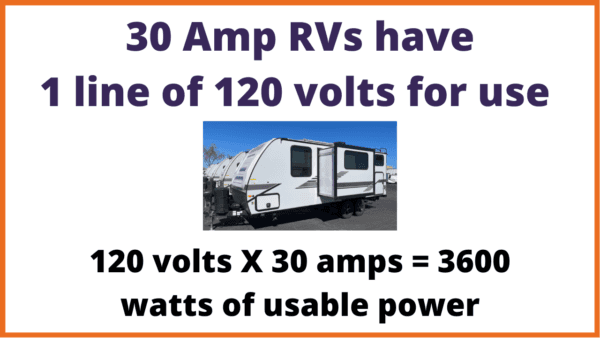
First of all, a 30 amp RV plug has 3 wires, 1 – 120 volt wire, 1 neutral wire, and 1 ground wire.
What does a 30 amp RV plug look like? Here it is!
Now lets use an electrical formula that says that if you multiply volts times amps it will tell you how much total power (or watts) can be consumed.
This means that if we have 120 volts and 30 amps, we multiply them and get a total of 3600 usable watts of power.
This is the maximum amount of power that 30 amp RV outlets can produce safely at one time.
A 30 amp RV plug has 1 – 120 volt hot wire, 1 neutral wire and 1 ground wire rated for 30 amps
So what can we run on 3600 watts of power? Usually most 30 amp RVs have 1 air conditioner, a microwave, a television and a refrigerator.
These are the main power hungry devices. But they also have several AC wall receptacles for use of other electrical devices.
But if you use too much power at one time by running too many power hungry devices, the system will be overloaded.
And then it will shut down as a safety feature. This means that the main circuit breaker trips to prevent overheating the RV wiring. And potentially causing a fire.
If you turn off some of the power hungry devices and turn the circuit breaker back on, you will usually be fine.
As long as your power consumption is within the 3600 watts of power that 30 amp outlets can supply.
So how do we get more power into an RV for more devices?
A 50 Amp RV Outlet – How Much More Power?
The best way to increase usable power for an RV is to buy an RV that is set up for 50 amps of power instead.
At face value, it sounds like an RV 50 amp receptacle has just 20 amps more power for use. But it actually has so much more. And here’s why!
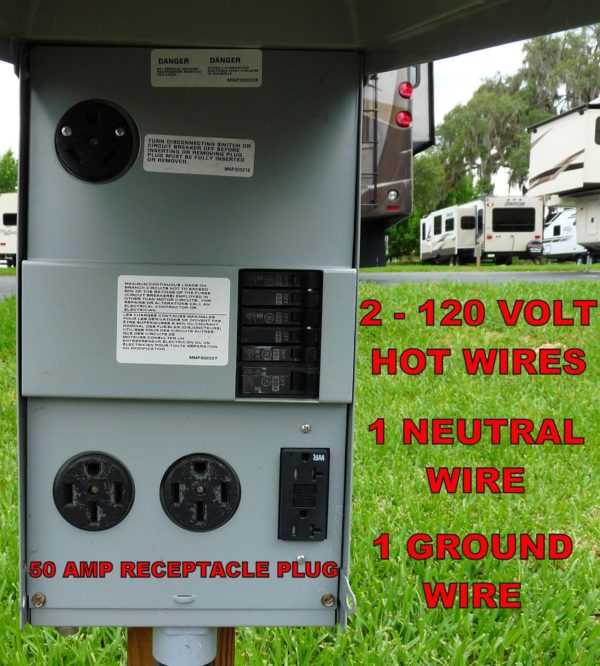
An RV 50 amp receptacle plug has 2 – 120 volt wires, 1 – neutral wire, and 1 – ground wire.
So that means that they did more than just increase the size of the one 120 volt wire of a 30 amp R V plug.
Instead, they included two 120 volt wires and increased the capacity of each wire at the same time.
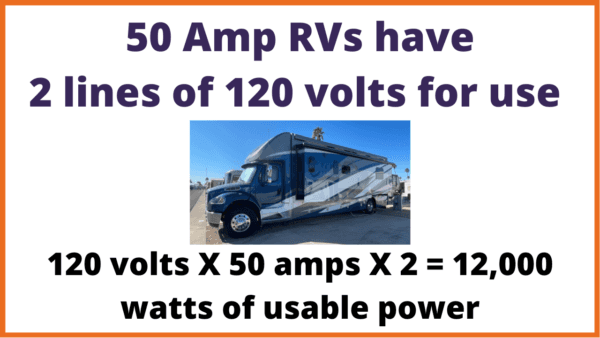
So lets use our formula for power consumption again. Now we have 120 volts times 2 lines which equals 240 total volts.
Then we multiply that by the 50 amps capacity of each line and we have a total of 12,000 watts.
This is the amount of power that can be safely consumed by a 50 amp RV electrical system at one time.
So what does a 50 amp plug look like? Here is a photo of one and you can see the two 120 volt lines in the center of it.
What does a 50 amp RV plug look like? Here it is!
Now lets look at a 50 amp outlet that the plug goes into. You can see two of them at the bottom of this picture.
A 50 amp RV plug has 2 – 120 volt hot wires, 1 neutral wire and 1 ground wire rated at 50 amps
What Does It All Mean For You?
So what we have learned is that a 30 amp RV can safely consume 3600 watts of power at one time.
But a 50 amp RV can safely consume 12,000 watts of power simultaneously. WOW! That is a big difference.
This means that a 50 amp RV can easily run more power hungry devices at the same time.
For instance, 2 or more air conditioners. A television. A washer/dryer. Residential appliances, including refrigerators. As well as the microwave and wall receptacles for other devices.
So what does all of this mean for you?
Well, if you buy an RV with 50 amp RV wiring, expect to pay more simply because the heavier RV wiring costs more. But do you really need all of that power?
It probably depends on your chosen lifestyle. Do you feel the need for a 40 foot diesel pusher? Or a huge fifth wheel? Or a toy hauler?
Then you probably will also need the 50 amp RV wiring that often goes with those kind of RVs.
But what if you are happy with a smaller RV, perhaps a Class B or C, or a travel trailer?
Most of these RVs have only one air conditioner which is one of the major power consumers.
And then 30 amps of power should be just fine for your needs. And you can save the extra expense of the more robust RV wiring.
Either choice is fine. Just realize the limits of each RV electrical system, and work within those limits.
Can You Plug A 50 Amp RV Into A 30 Amp RV Outlet?
So what happens if you have a 50 amp RV, but your campsite only has a 30 amp RV outlet? Is it even possible to plug in to the electric service in this case?
This is not as common a scenario these days as it has been in the past. But it does still happen. So you should be prepared for it.
As we discussed above, a 50 amp RV can consume 12,000 watts of simultaneous power.
But a 30 amp RV receptacle can only produce 3600 watts of power safely. So how can you make this situation work?
The good news is that there are 30 amp to 50 amp adapters that can help out here. And it’s really simple to use.
You simply insert your 50 amp plug into the female end of the adapter. And you insert the 30 amp male end of the adapter into the 30 amp plug.
You will have power in your RV at this point. But only 3600 watts worth at one time.
So just be careful with your power usage and you should be fine. In most cases only running one air conditioning unit will be possible.
And just keep the usage of other high wattage devices like hair dryers and microwaves to a minimum.
Can You Plug A 30 Amp RV Into A 50 Amp Plug?
OK, so we covered the possibility of plugging a 50 amp RV into a 30 amp RV outlet. But can we plug a 30 amp RV into a 50 amp RV outlet?
Let’s review the power difference again. The 30 amp RV can only safely handle 3600 watts of power at one time. Otherwise it will trip a breaker in the main RV electrical panel.
But the 50 amp RV outlet is capable of producing 12,000 watts of power at one time safely.
So are there adapters for plugging a 30 amp RV into a 50 amp RV receptacle?
Yes, there are. And they work very well and are simple to use as well.
Essentially, the adapter renders one of the 120 volt lines in the 50 amp plug useless. So no power is going through it.
The other line is still feeding power to the RV. It has a full capacity of 50 amps, but a 30 amp RV should never pull that much power. At least not without tripping the breaker in the RV itself.
Also, in this case, there is no change needed in the use of power within the RV either. There is still only 30 amps coming into the RV, so all electrical components should function normally.
A failsafe solution to the amperage challenge
Now some people insist that there could be a danger of possible overload in this scenario. They argue this is the case since the 30 amp RV is still plugged into a 50 amp line.
There are opinions on both sides online. And if you want to be absolutely safe, just buy a 30 amp EMSsurge protector that I will discuss below.
In that case you could use the 50 amp to 30 amp adapter and the 30 amp EMS surge protector together. And the surge protector would shut off the power to the RV is anything over 30 amps is detected.
It’s your call, but many RVers use the 50 amp to 30 amp adapters without any issue at all.
Don’t Forget To Protect Your RV Wiring
Regardless of whether you have a 30 amp RV or a 50 amp RV, you will need electrical protection.
That’s because power surges, spikes, and even low voltage can harm your RV’s electrical wiring. And also any sensitive and expensive equipment that you are using at that time.
So it makes sense to protect your RV and electronics from these dangers. After all, they can affect either a 30 amp or a 50 amp RV equally.
My recommendation is to choose an RV surge protector with EMS (electrical management system) capabilities.
There are portable units that will monitor your electrical connection at all times. And if a dangerous electrical event begins to happen, they shut off the electricity immediately.
Then as they monitor the situation further, they will turn the power back on when it is safe to do so.
Here are some RV surge protectors I can recommend for 30 amp and 50 amp RVs:
Disclosure: Please note this post may contain affiliate links. This means – at no additional cost to you – I earn a commission if you make a purchase using our affiliate links. I only link to products and companies I use and feel comfortable recommending. The income goes toward supporting the free content on this website
Conclusion
After reading this article, you should understand more about how RV wiring works.
No doubt the information was a little surprising too. For instance, to find out what a large power difference there is in a 30 amp vs 50 amp comparison.
Most RVers are completely unaware of how their RV electrical wiring actually works. So you are now well ahead of the game on this subject.
Happy and safe travels my friends!
Get My FREE Camping Guide
“The Top 5 Ways To Save Money On Campground Costs”
Get My Newsletter
Save on RV repairs
Get the best RV gear
Learn about RV life
RV tips and tricks
And get my free guide – “The Top 5 Ways To Save Money On Campground Costs”