If you have an RV water heater anode rod, then you have a Suburban water heater. There are two main brand names of RV water heaters. One is made by Suburban and the other is made by Atwood. Both are fine water heaters and last a long time with regular maintenance.
But a Suburban water heater has a porcelain lined steel tank. This kind of water heater tank is very similar to the kind used in your home water heater.
The only problem with this kind of tank is that it can corrode inside over a long period of time if it is not maintained properly. But to make the tank last a long time an anode rod is inserted into the tank.
This anode rod attracts the corrosive elements in the water and sacrifices itself to protect the tank lining. So every so often you need to replace the corroded anode rod with a new one.
This will keep your Suburban water heater working like it should for a long time!
Table of Contents
- Annual RV Water Heater Maintenance
- Inspecting Your Suburban Water Heater
- Replacing The Water Heater Anode Rod
Annual RV Water Heater Maintenance
It’s generally accepted that you should inspect your Suburban water heater once a year. This involves draining all of the water out, flushing it thoroughly, and replacing the anode rod if needed.
It may sound like a lot to do but the truth is that it is fairly simple and most RV owners can do it themselves.
As you get started, be sure to turn off the water heater itself. It often has a power button on the tank side, so just turn it off. But I always recommend to also turn off all of the power to the RV at the same time. This is just a precaution.
Then turn off the LP gas at the tank too. Finally, turn off the water source to the RV. If you are connected to a city water connection, turn off the faucet at the connection.
If you are using water from your fresh water tank, turn off the water pump. Then let the water in the heater tank lower in temperature until it’s comfortable. This may take a while so I often turn off the water heater hours before I inspect it.
Inspecting Your Suburban Water Heater

With all of the preparation done, open the pressure relief valve at the top of the water heater. Just pull it straight out. Let the water that escapes drip out until there is no more coming out of the tank.
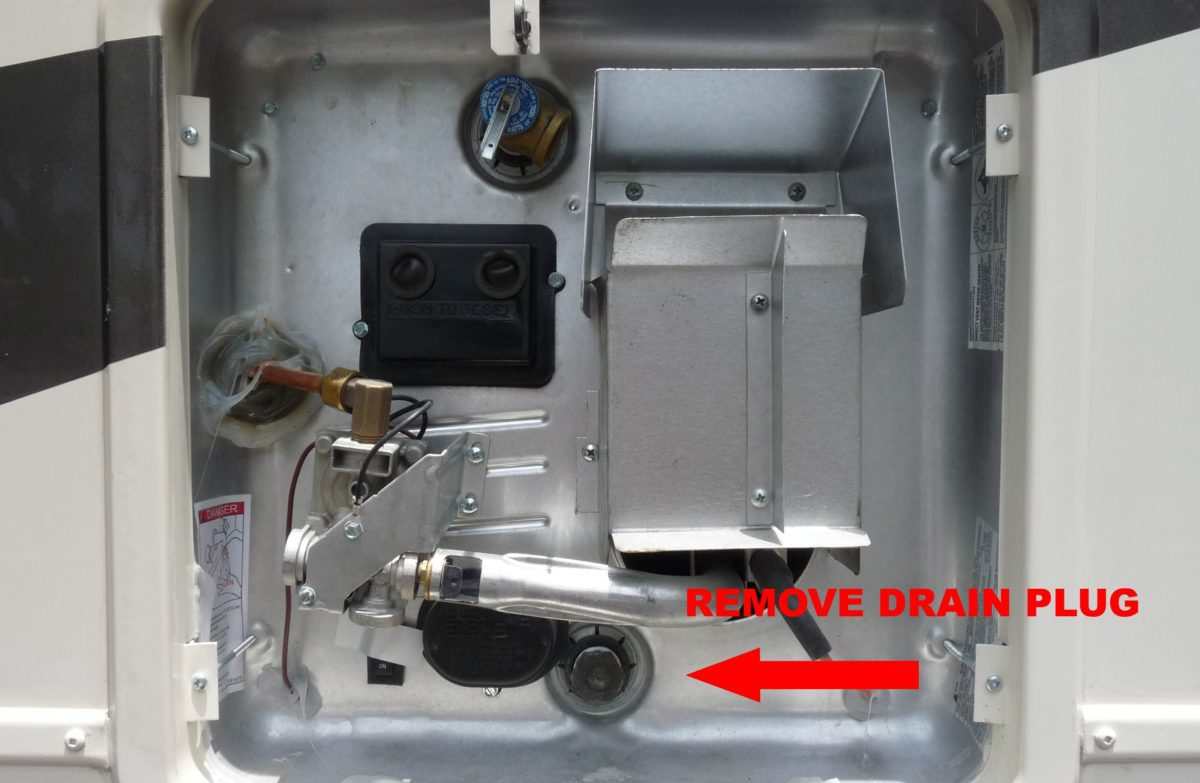
Now you can begin to remove the RV water heater drain plug that has the anode rod attached to it. You will need a 1- 1/16 socket with an extension and attach it to either a socket wrench or a breaker bar.
I prefer the breaker bar because sometimes the drain plug can get really tight. This is where the breaker bar helps provide more force to remove the plug.
There is also a special tool made for removing both the water header anode rod and the electric heating element. It’s an all-in-one tool and these can be very handy to have as well.
Click here to view the anode rod/ heating element removal tool


Inspect the condition of the Water Heater Anode Rod
Once the plug is removed you should be able to see what kind of condition the anode rod is in. If it is lightly corroded, you can use it again.
But if it is heavily corroded, be sure to have a spare RV water heater anode rod handy for replacement.
The next step is to thoroughly flush the water heater tank with an RV water heater flush wand. These can fit right on the end of a garden hose and you insert it into the tank for flushing.
Click here to view an RV water heater tank wand
Once the tip is inside the tank move the water stream around in all directions. But pay particular attention to stirring up any sediment that may have fallen on the bottom of the tank.
By doing this the sediment is blown up into the water that is escaping at the drain plug. Make sure that you flush the tank thoroughly for a while!
Replacing The Water Heater Anode Rod
After the tank is completely flushed, you can re-insert the old anode rod if it is not badly corroded. If it is in bad shape, just replace it with a new one.
Click here to view a new Suburban Water Heater Anode Rod
And be sure to use plumbers tape on the threads of the new anode rod. Just apply the plumbers tape manually around the threads of the anode rod a couple of times or so.
Then you can insert the anode rod into the water heater and begin to tighten it down. How tight should the anode rod be? Just snug, don’t over-tighten it!
At this point you can turn on the water to the RV again. But be sure to leave the pressure relief valve open as the water goes into the tank. That way the air has somewhere to go as the water fills up in the tank.
When the water starts coming out of the pressure relief valve, you can close it. At this point the RV water heater tank is full.
Now you turn on the faucets inside the RV to remove trapped air on the hot water side. After that is done, you can turn on the LP gas at the tank again.
And then finally the power to the RV can be restored. At this point you should be able to turn on the water heater again and in about 20 – 30 minutes you will have nice hot water in your RV.
And your annual RV water heater maintenance is done!

I hope you enjoyed this article on Suburban water heater anode rod inspection and replacement.
Have happy and safe travels my friends!
I just posted a question on your YOUTUBE Channel concerning RV Propane Detectors.
Would really appreciateJ your comments!
Thanks
Hi Jeff. Here is the comment I left on YouTube for you:
Your question:
So, when does an RV Propane Detectors Life Cycle begin? Is it 5 years from the Manufacture Date? Or is it 5 years from the first time 12 volt power is applied to the UNIT?
My response:
That’s a great question Jeff. I think it’s important to remember that any suggested replacement date is just a suggestion to err on the safe side.
Actually, many LP gas detectors function fine for years beyond the recommended replacement date. But it is recommended to replace them about every 5 years because many gas detectors are beginning to show their age about then.
And when something as important as your life is on the line depending on whether the detector functions or not, it’s a no-brainer to just go ahead and replace it to be safe. So whether you use the manufacture date or the date when it was installed, it probably is not that big of an issue.
But I know that as RV inspectors we always look for the date of manufacture that is usually printed on the back of the unit. That is the safest choice to make anyway. I hope that helps.